tomaz_slo
Member
Hi, not yet. This days I am in Guatemala. I’ll tell you about it when I’ll receive the strake.
 hopefully one of you might know.


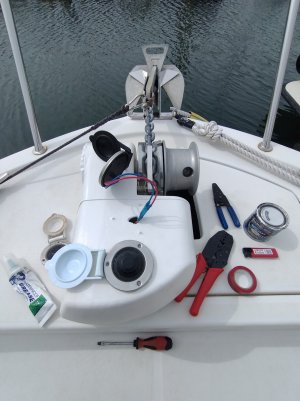
The black plastic thing with the O-rings is a plug to insert after you withdraw a speed log transducer. The curved metal tool is for fitting/removing the Teleflex steering hub as in this pictureI was clearing out the 760 lazarette the other day and I found these two spare parts in the corner.
Never seen them before and I don't know what they are for - I have two guesses prob both of which are wrong but would be good to know if they are essential bits of something useful!
The metal bit might be related to the emergency steering tiller sections clipped behind the rudder stock?
The plastic bit may be for the through hull transducer?
Or not
Any ideas?
Thanks

The plug may also be for a depth sounder transducer. This is an Airmar oneThe black plastic thing with the O-rings is a plug to insert after you withdraw a speed log transducer. The curved metal tool is for fitting/removing the Teleflex steering hub as in this picture
View attachment 154030
Www.solocoastalsailing.co.uk


+1 for checking the exhaust elbow, mine was nearly solid after 700 hours. Still steams even with the new one.
View attachment 145111
Hi Tomaz,I finally got my Antares 7,60, year 1997 with TAMD41p-a engine. I need some help from A760 owners...
1. I find out there is not automatic bilge pump installed. What is best solution? To install additional bilge or just a sensor somewhere in the shaft compartment?
2. On engine compartment cover there was gas spring removed.. I can measure that the lenghth od spring should be 600mm, but I don't know the spring respons kg needed. Someone know that data? Also I will glue aluminium foil on the insulation layer as the fabric on the surface is falling apart. What type of foil would be good? I wil glue with Wuerth aerosol glue.
3. Electricity scheme is weird... An isolator on minus? All cables are messed and plus is not fused near baterries.. Did you keep that original scheme? Also charger is located near gasoil tank. I think will move it closer to batteries.
4. I will empty raw water sistem and check the condition of heat exchangers... Can I leave the sistem empty until spring or will there be an corrosion process if I leave it empty?
5. Front right triangular window is broken. I think it's plexi... Can someone confirm that?
6. Fresh water tank... Some DIY ideas for consumption monitoring? Maybe turbo water flow meter?
I will be happy if there are some answers.
Best regards, Tomaz from Slovenia.
Thank you Razy for your help.Hi Tomaz,
Most of your other questions were answered, but I can add something to the water tank monitoring: I have installed the capacitor type foil sensors on both the fresh and black water tanks and connected them to my Raymarine display. It works really well and they are very easy to install. This is where I got them from: iSeries Tank Monitor | RV Monitor | Boat Monitor
You can get their display too if you don't have enough inputs left on your existing system, one of my friends has it and they work fine. The foil sensors stick to the outside of the tanks so there is no drilling involved, but they only work on plastic tanks.
I hope this helps.
Raz
This system looks great.Hi Tomaz,
Most of your other questions were answered, but I can add something to the water tank monitoring: I have installed the capacitor type foil sensors on both the fresh and black water tanks and connected them to my Raymarine display. It works really well and they are very easy to install. This is where I got them from: iSeries Tank Monitor | RV Monitor | Boat Monitor
You can get their display too if you don't have enough inputs left on your existing system, one of my friends has it and they work fine. The foil sensors stick to the outside of the tanks so there is no drilling involved, but they only work on plastic tanks.
I hope this helps.
Raz
Sorry about the late reply, I somehow missed your post. When I bought the 760 it already had two large iSeries displays and this small MFD, all of them connected via NMEA2000. The large ones are very useful, I can display the radar on one and the chart on the other.This system looks great.
I noticed you use a Raymarine display not the iSeries display. Does it work over NMEA2000?
Also what was that Raymarine display originally? Looks like an Autopilot controller but assume it's a small MFD....
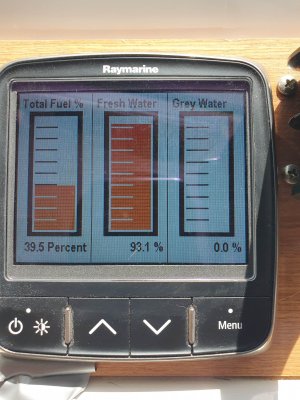
Thanks for the info Razy. Always nice to have good information displayed accurately. My analogue fuel tank meter seems to work consistently but would be good to have a second opinion on another device!Sorry about the late reply, I somehow missed your post. When I bought the 760 it already had two large iSeries displays and this small MFD, all of them connected via NMEA2000. The large ones are very useful, I can display the radar on one and the chart on the other.
The small one can show any field available on the NMEA network and it was setup just for depth initially. You can define multiple screen layouts (with up to 6 items on each screen) and use the arrows to scroll through them. I usually have the speed, depth, water temperature, fuel level and time when I am on the way.
The Autopilot is a separate unit (Coursermaster CM85i) with its own display and I have connected it to the NMEA network so it can follow a set of waypoints automatically.
When I installed the digital tank display I used the output from the analog fuel sender and I kept the original analog display too. Once calibrated the digital display is very accurate (down to 2-3 Liters) so the analog sender must be quite good.Thanks for the info Razy. Always nice to have good information displayed accurately. My analogue fuel tank meter seems to work consistently but would be good to have a second opinion on another device!


I have an oak mounting pad fitted to my stern hand rail whick I used for my 14kg outboard for several years although most of the time when on home pontoon it lived in the locker then moved it to rail whenever on board. No picture but will take one in a week. With the outboard mounted close to where the rail goes through 90 degrees to run along the port quarter the load on the rail base mounting self tapping screws is mostly downwards.Also, got a question re outboard brackets.
I'm trying to free up space in the lazarette and looking at putting a bracket on the transom for a Honda 2.3hp - 13kgs
Looks like two options.
1 - Fit a short section of SS railing on the top of the transom and use a clamp-on type like you see on sailing boats (but that would have to take the weight of the outboard as it would be suspended - or screw on a block for it to sit on). Might need access hatch cut into GRP to bolt on the SS rail as load bearing. Not sure if there is clearance for the motor to hang vertically as the gunwhale is quite wide.
2 - Fit a bracket on the back of the transom (screwed or bolted into the GRP) and have the tip of the outboard fin rest on a small pad on the swim platform to take the weight (presume needs an access hatch cut into the cockpit side of the transom). They have 4 screw holes so wonder if need a ply backer inside or not...
Anyone done one recently or have one on their 760?
If the bracket screwed into GRP doesn't need to be vertically load bearing (just supportive) would you still need an access hatch for bolts? Bit ugly if not essential.
1 - On railing
View attachment 176166View attachment 176168
2 - Bracket
View attachment 176165
Many thanks Plum, yes a couple of pictures would be fantastic next time you are down on the boat.I have an oak mounting pad fitted to my stern hand rail whick I used for my 14kg outboard for several years although most of the time when on home pontoon it lived in the locker then moved it to rail whenever on board. No picture but will take one in a week. With the outboard mounted close to where the rail goes through 90 degrees to run along the port quarter the load on the rail base mounting self tapping screws is mostly downwards.
This is what I have. The two plastic clips are for a MOB light.Many thanks Plum, yes a couple of pictures would be fantastic next time you are down on the boat.
Sounds good.
If strong enough, self tappers fixing the rail to the gunwhale would be ideal as that would save me cutting a hole for an access hatch and spoiling the view inside the cockpit.


The outboard had no other support, just clamped to the pad on the outside of the rail. The other bracket is for the horseshoe lifebelt with the bit of elastic to hold it onHi Plum
Thanks for the pics, looks a good solution with the rails fitted.
Quick question - does that pad allow for the outboard to hang securely unsupported on the inside or outside (or both)?
Also, what's that other outer bracket for - the one with the string (bottom right - last pic)?
Cheers
Dan