Tranona
Well-known member
Getting close to the end of phase 1 of my GH restoration. Launch booked for Friday subject to completing the antifoul (can of primer currently lost in Parcellforce!) Although I would liked to have fixed the engine issue over the winter, in the end I decided to fit a new Beta rather than spend money on the current Perkins. So I concentrated on 4 areas. First was dealing with the recommendations of the survey as condition of insurance. not too demanding as most were normal maintenance items anyway (seacocks, fire extinguishers cooker and gas check etc).
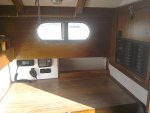
Next was electrics. I have already posted a bit on this but essentially I decided to rip most of it out and start again. The only major wiring kept was the cabin lighting circuits which are heavy duty domestic single wire cabling led around the deck beams, so I grafted these into a single distribution board and then to one switch on the new panel as each light is individually switched. The before picture shows the switch panel on the left of the chart table and the after the new panel (based on pre-wired panels from Axon) now on the right against the aft bulkhead. The original panel replaced with a new one housing the VHF, GPS receiver and sockets. Behind that will be the splitter and AIS plus the new distribution boards for the lights and mast electrics. All the old nav gear and instruments have gone and the new chart plotter, depth and log are in the cockpit bulkhead and the backs of them ar behind the new panel.
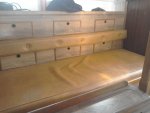
The interior was in clean condition but all original 1970's brown and orange vinyl as in the before picture. The new interior style is much the same as I did in my Eventide, with white panels wooden trim and blue denim style fabric. Upholstery was done by Steve Wells of Sew Trim in Botley - highly recommended. All the upholstery is done and much of the painting but I have not done much in the forecabin nor stripped and revarnished the well worn grab pillars. Lots to do next winter fitting shelving in the saloon and lining the exposed GRP hull sides with cedar T&G.
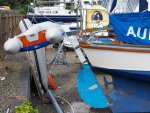
Final significant job was rebuilding the rudder to a similar design as was used on the last few that were built. The important change is to add some balance forward of the pivot point to lighten the helm and hopefully help low speed control. As can be seen from the after photo there is a cutout for the prop and it needed careful design and measurement to give clearance to the feathering blades of the 17" Featherstream that will be fitted with the new engine. Darglow helpfully provide a full size template for where the blades sit in feathered position so I drew the stern gear and rudder out full size on a board aiming for 10mm clearance. I have a bit of leeway as we plan to shorten the outer bearing housing which will move the prop forward by another 10mm
Edit For aome reason I can't seem to add the new rudder photo. Will try on a new thread
So hopefully by the weekend she will be in her berth in PYC and I can advertise the engine for sale as a runner. The new engine is due end of June so for the next few weeks I can concentrate on the mast and rigging.
Next was electrics. I have already posted a bit on this but essentially I decided to rip most of it out and start again. The only major wiring kept was the cabin lighting circuits which are heavy duty domestic single wire cabling led around the deck beams, so I grafted these into a single distribution board and then to one switch on the new panel as each light is individually switched. The before picture shows the switch panel on the left of the chart table and the after the new panel (based on pre-wired panels from Axon) now on the right against the aft bulkhead. The original panel replaced with a new one housing the VHF, GPS receiver and sockets. Behind that will be the splitter and AIS plus the new distribution boards for the lights and mast electrics. All the old nav gear and instruments have gone and the new chart plotter, depth and log are in the cockpit bulkhead and the backs of them ar behind the new panel.
The interior was in clean condition but all original 1970's brown and orange vinyl as in the before picture. The new interior style is much the same as I did in my Eventide, with white panels wooden trim and blue denim style fabric. Upholstery was done by Steve Wells of Sew Trim in Botley - highly recommended. All the upholstery is done and much of the painting but I have not done much in the forecabin nor stripped and revarnished the well worn grab pillars. Lots to do next winter fitting shelving in the saloon and lining the exposed GRP hull sides with cedar T&G.
Final significant job was rebuilding the rudder to a similar design as was used on the last few that were built. The important change is to add some balance forward of the pivot point to lighten the helm and hopefully help low speed control. As can be seen from the after photo there is a cutout for the prop and it needed careful design and measurement to give clearance to the feathering blades of the 17" Featherstream that will be fitted with the new engine. Darglow helpfully provide a full size template for where the blades sit in feathered position so I drew the stern gear and rudder out full size on a board aiming for 10mm clearance. I have a bit of leeway as we plan to shorten the outer bearing housing which will move the prop forward by another 10mm
Edit For aome reason I can't seem to add the new rudder photo. Will try on a new thread
So hopefully by the weekend she will be in her berth in PYC and I can advertise the engine for sale as a runner. The new engine is due end of June so for the next few weeks I can concentrate on the mast and rigging.
Attachments


Last edited:
")